Monday, July 22, 2013

Marrocotti

Simply put, marrocotti is my word for stuffing a squash like a noodle.
Harvesting is tricky.  Leafy squash and cucumber plants create canopies of camouflage for the delicate fruits below. And every once in a while (or quite frequently), the harvester finds a doozy. For me, the initial reaction of "whoa, look at this!" is usually followed by slight pangs of remorse for the neglect it suffered and then the convicted conundrum of how to eat it and enjoy it. Nothing shall go to waste.  

So tonight, we feast on "marrocotti" - my term for a an overgrown zucchini (a marrow) stuffed like a manicotti noodle. I'm sure the idea exists online, but for me it was born at a "zucchini fest" I organized during my first year of volunteerism at the Heifer Ranch. Courgettes were running rampant and we needed to take action. The solution: a potluck with dishes that must contain zucchini.  The results were impressive. 

And for me, gluten-free at the time, this was a great way to modify one of my favorite dishes. A hollow marrow provides countless culinary possibilities. Treat it like any pasta dish - spicy sausage, chopped greens, mushrooms and a variety of sauces are all delicious ways to mix it up.

So here's a photo recipe to get your brain marrow-nating. (I couldn't resist.)

Wash your courgette and cut off the ends so that it fits in your baking dish.
Using a knife or a serrated grapefruit spoon, hollow out the inside.
You can also just cut off the top like a Subway sandwich and hollow it out.

In a small mixing bowl make your filling.  I used ricotta cheese, two farm eggs,
salt, pepper flakes, Italian seasoning and some fresh chopped basil. 

I like to bake the marrow stuffed, surrounded and smothered.
I used the top* end of the zucchini, a summer squash, tomatoes, garlic, onions
and one of the last remaining jars of tomato sauce from last summer.

Stuff the marrow with the cheese filling (HINT: The cut off piece from the bulb end
is great for plugging one end while you fill the other). Lay it down on a bed of
chopped onions and layer the other veggies in around it. 

Smother it with sauce and bake it for an hour at 325 or until it's tender.
I like to add shredded cheese on top half way through the cooking time.

Let it rest before serving. 

Thursday, July 11, 2013

Time flies...

...and cucumbers get chubby.  We've been on the road for the bulk of the 30 days.  In garden terms, this is a crucial time.  Thanks to drip systems, timers and friendly neighbors, our garden survived the first weeks of June. At home we are enjoying wee (yet diverse) backyard harvests on a daily basis.  The farm has managed to independently produce a decent harvest of broccoli, potatoes and blackberries. Our rows at the neighborhood Victory Garden are yielding sweet tomatoes, tiny okra, surprise zucchinis and a bumper crop of cucumbers.

And oh the cukes - neglected little prickly chubs which will soon be transformed into cool summer salads, crisp tasty pickles and fancy little sandwiches.

After a week away, we were welcomed home by 42 lbs of cucumbers.
These are the big ones destined for pickle spears and halves. 

So the greenhouse stands abandoned and the beds runneth over. Dirt decorates my nails and humidity styles my hair. The flowers make me gush and the bugbites make me dance. Summer has arrived in style!


Monday, May 20, 2013

May Photo Update

Visit the PHOTOS page to see images of May - the good, the bad and the pesky.

Sweet on the Sour: Our Lemon Trees


THE SEEDS
Once a month our local UU church hosts a recycle/book swap Sunday. Members can bring in items like electronics and batteries to recycle and items like books to swap. Inevitably, items besides books appear on the swap tables. Those tend to catch my eye.

In February, I spotted a beautiful piece of wood on wheels.  As I picked it up and pondered what it might be, I noticed a woman at the other end of the tables waving her hand to get my attention. "If you want that please take it, but if you don't, I would really like to have it," she said sweetly. "What is it?" I asked in earnest. It looked a lot like the scooters I used to race around on in elementary gym class. "I think it's for moving large plants around," she answered. It made sense, and all of a sudden I wanted it. I didn't need it though, and judging by the look on her face, she was going to put it to good use right away.

As I walked towards her to hand it over, she continued to explain her intentions. "My lemon tree has grown too large for me to move in and out on my own. Having it on wheels would be so helpful."  She had me at lemon tree. My facial expression must have given me away because she continued to tell me about hers - how she grew it from a seed - how it produces quite well and oh, by the way, would I like her to bring me some seeds?

YES.

I was floored. A few weeks later she handed me a baggie of seeds from the very last lemon of the season. They were still in the juice; seven perfect little seeds.


THE HUNT
I intended to plant them right away, but of course, that didn't happen.  The baggie hung on the fridge for a week or so before I tossed it in to the fridge hoping the coolness would prolong their life. Eventually enough was enough and I came home on my lunch break with a mission to plant those seeds. I grabbed the baggie and went to the greenhouse to select my pots, my gloves and a hand trowel.  Then I walked to our potting soil mixing table in the yard, prepared my pots and reached into the baggie for the seeds. It was empty.

I panicked. These were the last seven seeds of the season and I had squandered them.  I was surely being punished for not planting them right away.  With my lunch hour ticking away I started micro-hunting - retracing my steps through the grass to the greenhouse and sifting through the huge table of potting soil. This was ridiculous, I told myself over and over. I was never going to find them, but I couldn't give up. Even if I could find just one...

I carefully turned the greenhouse inside out and there, tucked in the lip of an upside-down tub, I spotted a seed. I had to get tweezers to fetch it out. Thinking the rest had to be close by, I worked my way down into the 55 gallon trash can of empty potting containers. By the time I reached the bottom I had found five. Five was good enough, I told myself, but I couldn't stop hunting.  And good thing, because after a few minutes, the final two were plucked from the overgrown mess of clover under the trash can. The world felt right again.

I planted those seven seeds after loving on them with a photo-shoot. Something I should have done in the first place. Somehow I made it back to work on time with little to no residue from the chaos that had just occurred.

The woman said it would take a while to sprout them, so I waited.  Four long weeks went by and nothing happened. A voice inside kept nagging me to give up and throw them out, but my desire for a lemon tree persisted.

THE SPROUT
Six patient weeks later, the first sprout appeared. The next day it was gone - eaten for lunch by some unknown evil. The stump of the stem remained level with the soil looking sad and dejected. It had worked so hard to make an appearance.  The second seed sprouted to find a similar fate and my hopes began to fade.  I tucked the pots away on a lower shelf in the greenhouse just in case things took a turn for the better.

And turn they did.  Last week I discovered all seven pots boasting healthy seedlings. I don't know what made the difference, perhaps they just needed more time and a little less attention.  All I know is that I am proud to host them in my greenhouse (now alongside two grapefruit seedlings also from the same woman) and look forward to whatever is to come...hopefully in the shape of a pie.

Thursday, April 25, 2013

Carrot Catharsis

I have come to grips with the fact that the satisfaction I feel watching carrots grow heavily outweighs any satisfaction I feel after a productive day at the office. Ten minutes a day with three small rows of dragon carrots is enough to clear my head and make me smile inside. Though I admit that they are part of a larger picture which is growing up healthily around them, and all of it contributes to my "have a good day" in the morning and my "welcome home" at night.

So here's to my first time growing carrots...I can't wait to eat you!

Thursday, April 11, 2013

Old-Fashioned Egg Dying


Over the years I have managed to suppress my need for a Cadbury creme egg, but Easter still brings on undeniable cravings for egg salad and "robin eggs" (malt chocolate candies).  The candies were a staple in my Easter basket as a child and the eggs were a part of the day's festivities.

Unlike the eggs we hunted for at church or school (which were filled with candy or money), the eggs we hid around the yard at my house were filled with whites and yolks. This was acceptable because it meant two things: 1) we got to decorate them before the hunt, and 2) we got to make them into egg salad after the hunt. The Easter egg hunt was a compilation of tradition, art, food and party games. All things I love dearly. 

Normally my egg dying habits consist of food coloring from the store and watercolor resist techniques gleaned over the years. This year, while preparing to dye Easter eggs with the youth group at church, my husband sent me the following link: 


Complete awe. I was so taken with the photo that I couldn't sit still long enough to read the entire text. With a lack of onion peels at home, I proceeded with the method using pickled beets and chopped basil to create the dyes - the two things I had on hand which seemed to have prominent coloring. A little bit of vinegar in the water was something my mom used to do for our dyes when I was a kid, so I was happy to see it paralleled in the woman's article. 

I used three eggs to conduct the experiment.  Two white eggs and one brown one.  Since our farm eggs come with a variety of base colors, I wasn't sure how well the natural dyes would work. From the yard I gathered wild green onions, some clover, a dandelion head and a small frond of leaves. Using cheesecloth or pantyhose to hold it tight, I pressed the natural items to the surface of the eggs and then dropped them in the pot of dye. 

From here I boiled them as I would normally cook a hard-boiled egg. Instead of draining them after the cooking time was up, I let them sit.  The color was there, but subtle, so we went out for dinner and a movie and returned to find them a much darker shade. After gently unwrapping them, we were impressed by the preciseness of the patterns left behind. The method was very effective on both white and brown eggs.

Turns out you don't have to press the leaves super tight. Just get it snug.
The dye has to dry before handling. You can see where it rubbed off. 

With three novice successes under our belt, we headed to church to lead youth group. Hunting for leaves and flowers around the church was a fun part of the process. While the eggs soaked, we led the lesson, and the day wrapped up by unwrapping the eggs. 

Our dyes included beets, black beans, and green tea.  We also tried the onion peel method from the link (we bought onions at the store making a point to load the bag with stray peels in the display area). Simply wrapping the eggs with onion peels and tying it up with cheesecloth produced the most fascinating designs and vibrant greens, reds, oranges and yellows. 

I am eager to try this again using what I have learned from the first two experiments. Using onion peels was so incredibly simple. Even without the fine motor skills required to secure cheesecloth, impressive results can be achieved by simpler means. Also, in the onion and garlic drying areas of farms that I've seen, there is no short supply of peels laying around. Needless to say, I will never go back to my old way of dying eggs.

I think a Roetzel Easter tradition has just been born.

Eggs dyed by the youth using onion peels, beet, tea and black beans.
These eggs were pre-cooked and only sat in the dye for an hour.

Wednesday, April 10, 2013

The Moods of March

March is going...going...gone. I fear that most of it was eaten alive by my cubical, but in spite of my indoor confinement, spring sprung.

The weeks of March flew by in gusts of moody magnificence, bringing every type of precipitation imaginable to Arkansas. Rain, hail, sleet, snow and fog accompanied temps from the 20's to the 80's. We became vigilant of the weather forecast and did our best to accommodate the extremes.  A string of hot sunny days prompted me to rip the entire covering from the greenhouse entrance way.  The three-sided tunnel which remained was a perfect home for the plants to stay toasty and get a nice breeze. A few days later, when the temperatures plummeted below freezing, the plastic cast-offs from the greenhouse became the perfect covering for newly sprouting seeds in the garden bed. We tromped through house each morning and evening with flats from the greenhouse, trying to keep them at a desirable temperature.

All in all, we survived the moods of March.

The cold frame boasts four healthy tomato plants, new rows of beet and carrot seedlings and a continuous supply of lettuces.  We've been told that the lettuce will start to get bitter after the third cutting, so it may be time to start eating from the lettuce in the garden bed and use the space in the cold frame for something else.

The cold frame as of a couple weeks ago.

The greenhouse hosts an odd assortment of things these days including brassica seedlings, varying maturities of tomatoes, peppers, onions from seed, and newly seeded flats of okra and basil. We also have fruit trees on the rise. The fig tree suckers are budding; a mystery branch Mike decided to pot already has leaves; seven peach pits (planted last fall after canning) have sent up healthy-looking shoots (left); and seven Meyer lemon seeds are keeping us in suspense. We've rehung the shower curtain door so as to keep the temperatures in there a little warmer now that the weather has stabilized on April-showers mode.


A fig branch showing off its new leaves in our kitchen window. 

The "flower bed" is rapidly being remodeled to be more of a garden bed.  Bulbs are being dug up and sequestered to the shady patch in order to maximize space for a small amount of spring crops.  I plan to push the limits of our small area by following intensive square-foot gardening and companion planting principles.  At this point, the bed is mostly full of lettuce, greens, cabbages, a variety of peas, carrots and beets.

In all of our areas we are following the up/down/up/down planting concept.  This is simply a way to maximize your space by growing root veggies in between crops that grow above ground. For example, our rows go something like this: bok choy, beets, lettuce, carrots, greens, beets, etc. Aside from utilizing the space well, the plants help each other out, hold down the soil and provide a nice leafy canopy for ground cover.  Just make sure you are providing them with plenty of nutrients and that you time their sprouts so that one does not shade the other out.


Other progress includes the rapid return of red clover in the back yard. When we moved into this house the yard was mostly hard clay with very little growth.  Treatments of compost and seeds have paid off and we love having healthy green growth in both the front and back yards. My bare-feet are especially thankful for the soft clover.  We enjoyed the surge of bees to the yard last year when it started blooming, but this year we made a point to cut it before it bloomed so as to maximize nitrogen levels in the soil.

While progress at the house puttered along during March, progress at the farm idled. Without a place to stay, we were hesitant to put in our irrigation system or plant too much in the ground. But with too many brassicas getting root-bound in the greenhouse and the itch of the growing season passing us by, we threw our hesitations out the window and spent April 1st at the farm planting. Rain was in the forecast for the rest of the week, so irrigating crops wouldn't be an issue.  Two hundred feet of potatoes, 75 feet of onions, 50 feet of broccoli and 25 feet of hardy root vegetables later, I woke up with soreness in my legs beyond any roller derby aftermath. Our main goal is to get our soil loosened and working, but vegetable bi-products are very welcome.  And if the whole thing flops...April Fools, I guess!


Wednesday, February 27, 2013

Fig Bars

A homemade spin on a delicious snack! These rustic fig newtons are perfect for packing in lunches or adding a fancy touch to a bowl of vanilla ice cream.

For this recipe and tips on preserving figs, CLICK HERE!


Monday, February 25, 2013

Fresh Pasta

New post in RECIPES: FRESH PASTA

The beauty of making your own pasta is that you can flavor it with all sorts of additions. Throw in whatever you have around, whatever will compliment your meal or whatever you want to sneak into your kids' diets.

Here's a pasta tale from a rainy day in Arkansas.

Our First Farm Workday!

Never underestimate the value of volunteers. With the seasonal clock ticking and no-till methods at the forefront, we had to get a move on prepping our row crop area.  For two people, this would have been a daunting task. For sixteen, no problem.

I love planning events, so a farm workday was a treat to brainstorm. There was plenty of work to do and coordinating two meals with no electricity or running water was a delightful challenge. In many ways, planning for Saturday was like a mini remix of our wedding weekend (minus the white dress), so it was a piece of cake. Two weeks out, menus were planned, supplies were ordered and invites were sent.

RSVP's rolled in immediately and soon we had twice the response we anticipated. Food prep was going smoothly and packages were arriving at the house daily.  What could possibly go wrong?

Two days out, the rains came. Then the ice. Temperatures plummeted. Cancellations started trickling in from those who had RSVP'd. The fabric mulch - a critical part of the rows we were to create - was delayed and wouldn't arrive on time. We readjusted our expectations for the day and took comfort in the sunny 55 degree forecast for Saturday.

Saturday arrived after a rather pleasant Friday, and our hopes were refreshed. With the truck and the car loaded, we left Little Rock with one extra passenger. In Conway we met up with another car - a girl from my roller derby team and two of her friends. Once on the farm, we unloaded the truck in a hurry so that Mike could make it to the feed store before it closed at noon. Another friend arrived and lunch was served - curry chicken salad with grapes, local egg salad with cilantro, creamy potato salad, hot baked beans, bread, lettuce from the cold frame, homemade fig newtons, peanut butter balls and a dozen mason jars with an assortment of jams and pickled things. Everything made from scratch with as many local ingredients as possible.  Even if the day was miserable, we were going to eat well.

Just as I was feeling frustrated that I had forgotten the pies and mentally calculating what seven of us could accomplish, Mike returned with a load of straw bales and three cars in tow full of volunteers from the Heifer Ranch in Perryville. In an instant, our numbers more than doubled. Everyone cheered and the workday began.

We removed the manure from the front porch slab and transported it to the garden areas in truck loads.  Here it was mixed with compost and soil from home and then spread out to mark seven 150 ft beds. We added a layer of newspaper under the compost since we didn't have the mulch fabric to place on top just yet. Instead, we covered the rows with a thick layer of straw. On the next workday we'll lay the drip tape, put down the biodegradable mulch with fabric staples and move the straw on top of it all. A slight glitch in plans, but we feel confident that it will work out alright.


A crew of people cleaned up around the farmhouse: chainsawing trees, picking up branches and making piles of scrap metal and stones for future use. A couple people tended to the pork shoulder which spent the day in the smoker in prep for supper and many cameras circulated the property capturing proof of the day. Progress was made digging down to the water main in prep for an outdoor water spigot to be installed and we were happy to discover 70 ft of water in the property's main well. Mike's grandfather was a well-driller, so there are several wells on the property to explore.

Other successes of the day included spraying the land with a worm tea mixture in an attempt to decrease the acidity levels in the soil, broadcasting a variety of seeds and seed balls, moving an enormous cast iron bathtub full of worms over to the covered porch area (it took all of us to lift it), and forging some very flooded areas in the truck in order to retrieve a load of sandy clay for a future cobbing project.

 A good time was had by all - even those who didn't participate in manure flinging fights or rolling down the hill in a rain barrel. As the sun set, we gathered around a campfire which provided warmth, a place to burn ample amounts of wood, a surface to heat apple cider, and coals for cooking foil packets of seasoned vegetables to compliment our pulled pork sandwiches.

My heart was glowing as I relaxed in my camp chair looking around the circle at all these amazing, like-minded people. They are more than volunteers, more than just friends...we are partners in creating a more hopeful, healthy, sustainable future. We are the ideas, the hands, the energy and the support system. We can make great things happen.

After the last car pulled out of the driveway, Mike and I sat by the fire as the embers burned low. I took a stroll down to the garden area and lingered between the rows of golden straw glimmering in the moonlight. The transformation was like magic. Though the vision in my head may be 20 years in the making, this land already feels like home.


For photos of the workday, CLICK HERE!


Monday, February 18, 2013

A Visit to Summer of Solutions LR = Kale Soup for Supper


Our day was perfectly balanced with a trip to help weed at a local garden project and then warm soup to compliment a cozy night in during the storms.

Check out Summer of Solutions Little Rock in FARMER FRIENDS and Kale Soup with Beans & Bacon in RECIPES.

Making Stock

Anyone with a garden has to know how to make stock. What else do you do with all those bits of veggies that are about to go bad, and you just don't have time to do something with? And if you're cooking from scratch a lot, you'll be generating plenty leftover bits of vegetables. Sure you can toss them in the compost. But you can make stock from them first.

I own a copy of Anthony Bourdain's Les Halles Cookbook which devotes a whole separate chapter to stock. I used to follow Bourdain's guidelines for his rustic "workmanlike stock" fit for country french cooking. Now I feel that maybe his a basic stock, if you compare it with the very posh stocks of chefs like Thomas Keller. But Bourdain has nothing on my regular down and dirty stock process. He does things like peel onions and carrots. And wash them. And removes celery leaves. And roasts his bones in a tomato paste and flour coating. And sticks to just the big classics: celery, carrot, onion and bouquet garni. And he strains and removes unsightly bits. Not me. I don't roast the bones because I'm reusing the bones from previous meals. I don't remove celery leaves...I save them and freeze them just so I can use them in stock. I love all the little bits and scraps. And I believe they make the best stock, better than the purist versions. Here's an incomplete list of what I save:

  • carrot peels and ends
  • celery stems and leaves
  • onion skins and ends
  • garlic paper
  • the interior and tops of bell peppers
  • corn cobs
  • leftover bones of any sort
I save all of my bits and pieces in jars and bags and put them in the freezer. When I have enough it's time to make stock. I'm not picky. I don't do separate veggie stock and chicken and beef stock. It all goes in together.

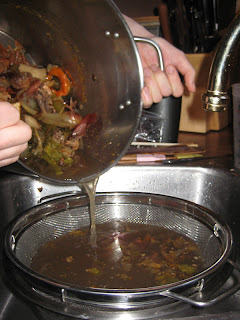
Here it is in all its gloriousness in a big stock pot. You can also see sections of old turnips. I added some newer bits of onion, carrot, celery, and garlic because I had plenty of all of them laying around. In this one were bones from roasted chicken legs, bones from chicken wings, and some oxtail from a previous stock making that I judged still had more goodness to give. To all this I added 2 tablespoons of salt, a couple bay leaves, and a generous helping of "Italian herbs". (And a squirt of kechup. We didn't have a tomato paste open. The robustness of the tomato is nice in a stock. And the additional vinegar and sugar in kechup acts as an additional flavor enhancer.) Next it all gets covered with cold water. Then heat, low and for a long time. This one, because I didn't want to bother with it, sat on low for almost a full day. Finally you strain.


Nothing fancy. Just a colander set into a big bowl. You'll have to let it drain for awhile. You're left with tasty stock. It keeps for about 6 weeks in the fridge I'm told. Or you could pressure can it. Or freeze it. Since I don't like to have too many jars of stock taking up space in the fridge, I like to condense it. So I put the strained stock back on the stove and heat it on high to boil it down. I'm left with very useful concentrated stock.

You can use stock in just about every recipe that calls for water. You can use it for rice pilaf, for chili, for brining. Use it to make the best soups of course, or sauces or gravies. Having good stock is the #1 secret for making your home cooking more like restaurant cooking. Just be wary that there are a few things to don't go in stock. Cauliflower and broccoli are too strong. Cabbage can be OK if you don't cook it too long. Apple cores and the like are good, but I've never tried strawberry tops or banana peels. I've never done potatoes, but would think they soak up more flavor than they donate. 

Monday, February 11, 2013

Potting Mix & Paradoxes


The other day, I made my first potting mix. There’s a certain irony to potting mixes. Normal soil is made up almost entirely of clay, sand, and silt. Yet those ingredients are absent in most potting mix recipes. The popular mix ingredients are perlite, vermiculite, peat moss and compost. Up until now, we have been planting in straight compost with fair results. But I'd like to try the conventional wisdom. For this first mix, I went with something close to a standard recipe: 2 parts peat, 1 part perlite, 2.5 parts compost, and a bit of sand. I was fairly amazed at how much water the peat moss held! Each "part" of the mix was measured out using a 5 gallon bucket, so there was quite a bit of mix there, but the compost was already soaked and I had sprayed down the perlite before adding it (to keep it from throwing up so much dust). Still, to wet down the peat (again, to keep it from throwing up dust) I added gallon after gallon until it was all wet. I would guess that those 10 gallons of peat soaked up 5 gallons of water! I see what growers like it, germinating seeds and seedlings really don't like drying out! Still, peat moss is a non-renewable resource from Canada, and there’s something odd about growing "local food" with soil from that far away. As I said, I wanted to test it this once, but I hope I can find a substitute in the future. For our next mix I'd like to create something close to what the books describe as "perfect soil": a perfectly balanced loam of clay, silt, sand, and compost. I hope such a mix works near enough as well as the conventional mix we've just created, as it would be more sustainable.

It's almost odd putting so much thought and effort into potting mixes. And we put even more effort into the soil that our garden and grass will grow in. Most people probably think this makes sense because they think of soil as plant food. Once upon a time, everyone thought it was. But it's not. No plant has ever digested a speck of clay, or silt, or sand (or peat moss). Plants are made of air. The carbon of carbon dioxide is the raw material for their stems, leafs, and flowers. A process of conversion fired by sunlight and lubricated by water. So why do they even need soil? A question often asked rhetorically by the fathers of chemical agriculture.  But, you CAN see the soil change over time if plants are repeatedly grown and harvested. The soil changes from a rich black or brown to a light tan. From light and fluffy to hard and condensed. Plants, as a matter of fact, do eat from the soil. But the soil is their plate, not the food. They absorb the  minerals and chemicals that are available to them. And they are quite particular. You can't just put nitrogen into the ground. The nitrogen has to be in a certain chemical form. And it's the flora and fauna of the soil that puts the necessary amendments into the necessary form to grow healthy plants. These amendments are more catalyst than food, and the plant needs just a tiny amount of them. But they are absolutely necessary for growth. And so we obsess over soil. Healthy soil = healthy plants. Coincidentally, these same soil-living flora and fauna are also what keeps soil soft and friable, water-absorbing and root-friendly. Nature designs well.

Seed Germination

Over at Living Web Farms, I was introduced to the concept of a seed germination box through Patrick Battle's video workshop on Seed Starting. The concept is simple: a box that holds seed trays in a warm, moist environment to get the seeds to sprout, after which they can be moved outside or to a greenhouse. According to Mr. Battle, a germination chamber significantly increases the % of seeds which will germinate. That and the fact that we need someplace to start seeds that stays warmer than outside was good enough for me! I decided to make one. So here's me putting the frame together:
And here's the frame supporting a seed tray:
Each shelf should support 3 trays, so with 3 shelves, that's a possibility of 9 seed trays germinating at once. Aim high. For a little more support, I added some leftover window screen on the top shelves. The bottom shelf I kept open so I could drop a water tray in.

 I decided not to build any more of a wooden shell around it. The 3 shelves with the 4 upright supports was pretty stable, any more hard structure would simply be unnecessary weight. What was needed was insulation, so I went with 1" thick rigid foam insulation. 
 The front door just fits in via friction/compression. A couple screws sticking out provide the means of removing it.

To keep the chamber warm and humid, I have an aluminum tray that fits in the bottom, to be filled with water. The heat is supplied by a 100 watt aquarium heater with a built-in thermostat. I plan to set it at 76 degrees. We'll see how it works!

EDIT: I had a conversation with Patrick Battle, and he's doubtful that the aquarium heater will work. In his model, he uses a remote bulb thermostat which hangs in the air in the middle of the box and that's what triggers the heating element. So the heating element gets very hot and promotes evaporation as it the water becomes much warmer than the box. My heating element won't warm the water as much, and won't provide as moist an environment. Still, it's much easier to set up, and I'm going to give it a go.

Thursday, February 7, 2013

A Day at the Farm


My face is wind-burnt and my brain feels exhausted, but we had a very productive visit to the farm today.  Our to-do list wasn't unmanageable, so we left with a sense of accomplishment (and another to-do list).

The highest pond. Needs restoration from cattle damage.
The farm house is straight ahead in the distance.
A large portion of the day was spent walking the property. We've walked through the middle of it many times, but today we explored the fence line - the outer bounds, looking in. I feel as though we were really seeing it in it's entirety for the first time.  This is exciting and overwhelming - making us rethink our plans and explore new possibilities. I am reminded of my days as an art major, staring at a huge blank canvas with no idea where to start or what it may become.

We discovered another pond near the back near a spot that would be perfect for a future house. We found a dried up creek bed and several active streams weaving through the contours of the old hills.  We also came upon heaps and heaps of sandy-clay which will be perfect for building cob structures. We took a hundred pictures in order to capture the land in its state today with hopes that they will be the "before'' shots of our farm story.

Front of the house. Not livable.
Back of house. Lots of clean-up to do.

The makings of a worn tub. We hope they like their new home.
Successes of the day included finding the water meter, stopping by the water department to initiate service, meeting with electricians to discuss installation options, identifying the forages already growing on the property and converting an old bathtub into a worm farm. The woman at the water department connected us to the 911 location service, so we are one step closer to actually knowing the address of the old farmhouse.  We also narrowed down our potential garden sites, greenhouse location and planned activities for a farm workday we are hosting on the 23rd. 


The first brush stroke is always the hardest. It's time to finalize some big purchases, send the workday invites and get moving.  After that we can fill the canvas with ease, adding to and painting over the composition as we go.